Node-RED 0.14.3 is now available to download or npm install.
If upgrading, please read the upgrade instructions.
If you are using the pre-installed version on Raspberry Pi Jessie, the repositories will be updated in the near future.
Editor Updates
The biggest change in the editor for this release is the new node edit tray that replaces the old edit dialog. This is something we’ve been working on for a while and was a necessary change to enable some other features in this release.
Knowing it was a big change, we made a demo of it available to the community a few weeks ago. That led to lots of great feedback that has helped us to refine the design along the way.
A really common complaint with the old edit dialog was that you couldn’t interact with the sidebar whilst the editor was open; when you were most likely to want to check the node’s help. With the new edit tray, you can continue interacting with the Info and Debug tabs whilst editing a node.
Detaching wires (again)
The last release added the ability to move wires by holding the Shift key when you drag on a node’s port. We’ve updated it in this release so that if one of those wires is currently selected, we’ll only move that one rather than the whole bundle.
Re-ordering tabs
Yup - re-ordering your tabs. You’re welcome.

Filtering the Debug sidebar
You can now filter the debug sidebar to only show debug messages coming from nodes on the current tab. When enabled, as you switch tabs the sidebar refreshes with the messages for the tab you’re on.
Also, if a message comes from a debug node inside a subflow, we’ll highlight the subflow instance node to help you track it down.
Built-in Change-log
With so many changes going in, it can be hard for users to know what’s changed. Believe it or not, not everyone reads these blogs posts. We’ve now made the change log that lists all the high-level changes in the release available from the drop-down menu.
This is a small step in helping users discover new features.

Node updates
Link nodes
We’ve added a new pair of nodes that will help you better organise your flows; the Link nodes let you create a virtual wire from the end of one flow to the start of another.
If you select a link node it will show the virtual wires on your workspace, including any links that disappear off to another tab. To help you navigate around them, the link to another tab can be clicked and you’ll be taken to that tab and the corresponding link nodes pre-selected.

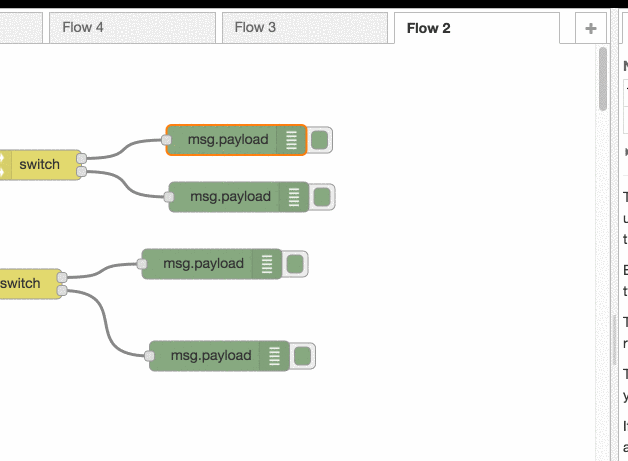
Split/Join nodes
These have been on the to-do list for a long time and we’ve finally got them into a release.
The Split node can be used to break a single message up into a series of messages. For example, if msg.payload is a String it will split that text using whatever character you want so you get a message for each part. An array will get split into its individual elements and an Object into its key/value pairs.
The Join node will, by default, do the reverse of the Split node. If you feed it a series of messages sent by the Split node, it will join them back into their original form. You can also configure it manually for a wide variety of scenarios. Check the node’s help for more information.
MQTT with TLS support
The MQTT nodes can now make properly configured TLS connections. This makes use of a new common TLS configuration node where you can provide paths to your certificate files. This node is available for other nodes to start using - take a look at the mqtt-broker node to see how to use it.
Whilst we were in there, we’ve added the ability to set the QoS you want to subscribe with on the MQTT In node.
HTTP In nodes - cookie support and HTTP PATCH
The HTTP In node has had two significant updates; added PATCH as an option and added a standard cookie parser middleware in the stack.
This second item means you can now access any cookies set on the session using msg.req.cookies.
We’ve also made it easier to set/clear cookies using the msg.cookies property on messages passed to the HTTP Response node. Take a look at the node info for more details.
Change node
A new option has been added to the Change node to move a property - something you could do before in two steps with a ‘set’ followed by a ‘delete’.
We’ve also updated the syntax you can use when identifying a property to use a more complete
object syntax. For example, you can now access properties such as msg.payload[1].name or msg.payload["another property"]. This is true of any of the typedInputs used by a
few of the nodes.