Node-RED 1.3 is now available to install. If upgrading, please read the upgrade instructions.
The Change Log has the full list of changes in this release, but here are the highlights.
Please note this is the last release that will run on Node 8 or 10.
Next month we will be releasing Node-RED 2.0 that drops support for those versions of Node as they have reached end-of-life.
Release video coming soon - subscribe to the channel so you don’t miss it!
Headline features
Function node use of npm modules
We’ve made it much easier for a Function node to use extra npm modules.
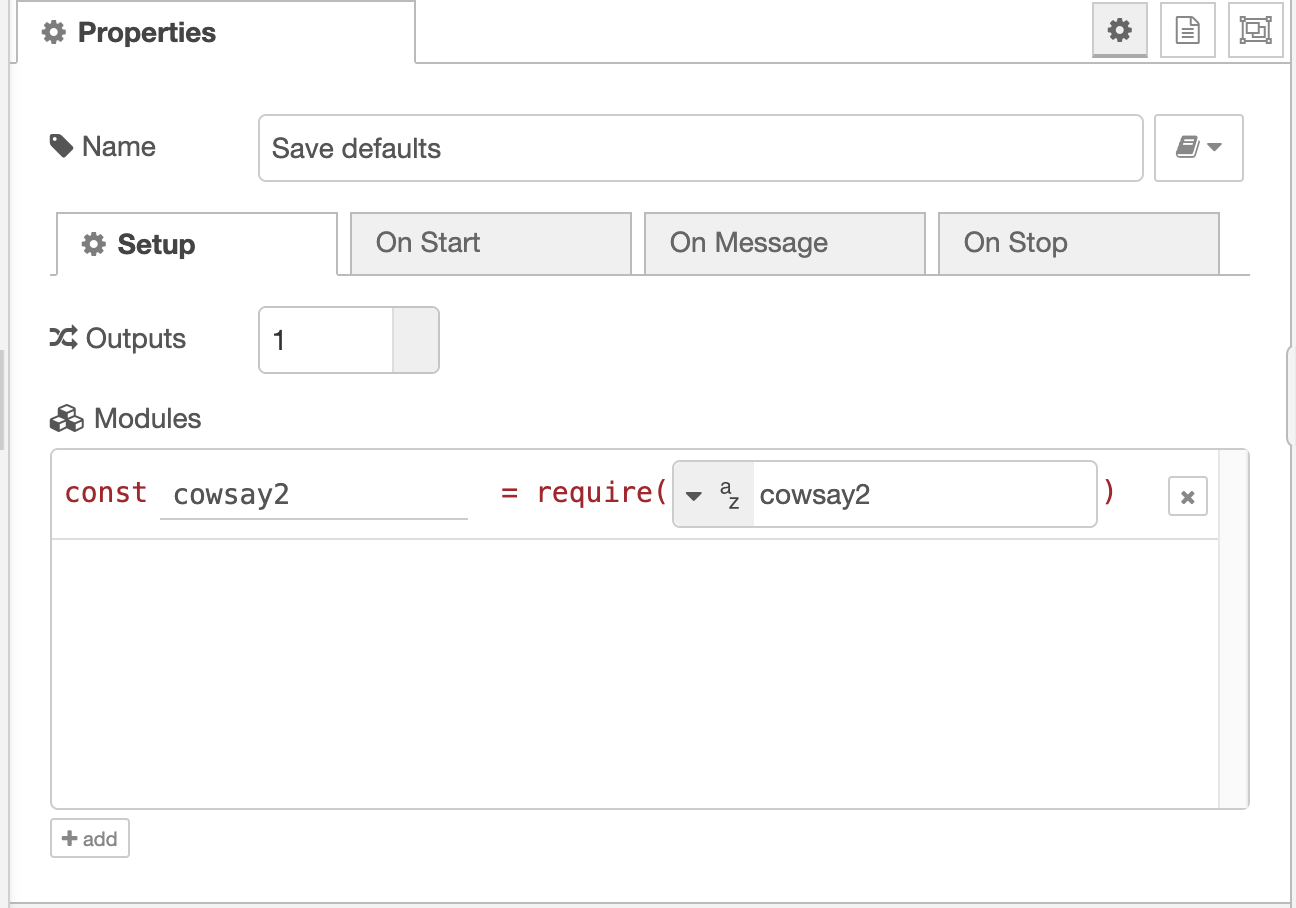
By setting functionExternalModules to true in your settings file, you will then be able to configure your function nodes with a list of additional modules it will use. The runtime will automatically try to install those modules when you deploy the flow.
Unlike the functionGlobalContext approach, where your Function node would have to retrieve the module from global context before using it, the modules loaded by this new feature are automatically required and defined in your code.
The edit dialog has a new setup tab where the number of node outputs and the list of modules used by the node can be configured. (If you haven’t enabled the functionExternalModules setting, you’ll only see the Outputs field).
You’ll see we’ve relabelled the other tabs to try to make it clearer when the code in those tabs is run.

Referencing msg properties in Change/Switch nodes
It is now possible to nest references to message properties in the Change and Switch nodes.
For example, if you are receiving temperatures from a number of sensors. Each message has msg.topic set to the room the sensor is in and msg.payload is the value. You want to store the current temperature of each room in context under flow.rooms - for example flow.rooms.kitchen and flow.rooms.garage.
To do this with the Change node in previous versions of Node-RED required the use of JSONata. For example:
- set
flow.roomsto the Expression$merge([$flowContext('rooms'),{$.topic:$.payload}])
More likely, users would fall back to a Function node - something it would be nice to avoid.
With 1.3, it is now possible to configure the Change node as:
- set
flow.rooms[msg.topic]to the value ofmsg.payload.
In fact, any node that uses the RED.util.getMessageProperty(...) utility under the covers will gain this functionality.
Node-RED Plugins framework
We’ve introduced a new plugin framework for Node-RED to make it easier to customise and add new features. Its very early days for this feature - but will form the basis for lots of new things in the future. By delivering extra function via plugins rather than core code, it keeps the core smaller and makes it easier for applications that embed Node-RED to be more selective over what ‘extra’ features then want.
Taking advantage of this new framework, there are two new types of plugin available today:
-
Editor theme plugins, making is easier for users to install new themes and enable them in their settings file. More details.
There’s a nice collection of contributed themes available here. Keep an eye out for updated plugin versions of those themes.
-
Library source plugins. These will allow users to configure additional libraries that will appear in the import/export dialogs within the editor. We’re publishing a local file system plugin (@node-red/library-file-store) as a first example. More details
Adding extra resources
A common requirement for both plugins and Nodes is to be able to load additional resources into the editor. This could be images in the help text, or extra JavaScript libraries.
Previously this has required lots of additional work by the Node to make those resources available to be loaded.
With the plugins framework we’ve made this easier to do - and this applies to Nodes as well as plugins.
Now, if a module has a folder called resources at the top level, the runtime will automatically make its contents available to be loaded over the Admin HTTP api.
The node/plugin is still responsible for doing the loading of that content in the editor, but now they don’t need to create the routes to do in the runtime.
The Creating Nodes documentation has been updated with more details.
npm packaged subflows
It is now possible to package a subflow as a module and publish it to npm to be installed in the palette just like any other node.
As part of this, the subflow property edit dialog has a new ‘module properties’ tab where you can set optional meta-data about the subflow that can be used when generating an npm module.
The process for generating the module is currently entirely manual. We’ve added a section to the Creating Nodes guide that details the process.
Editor Features
Export preview
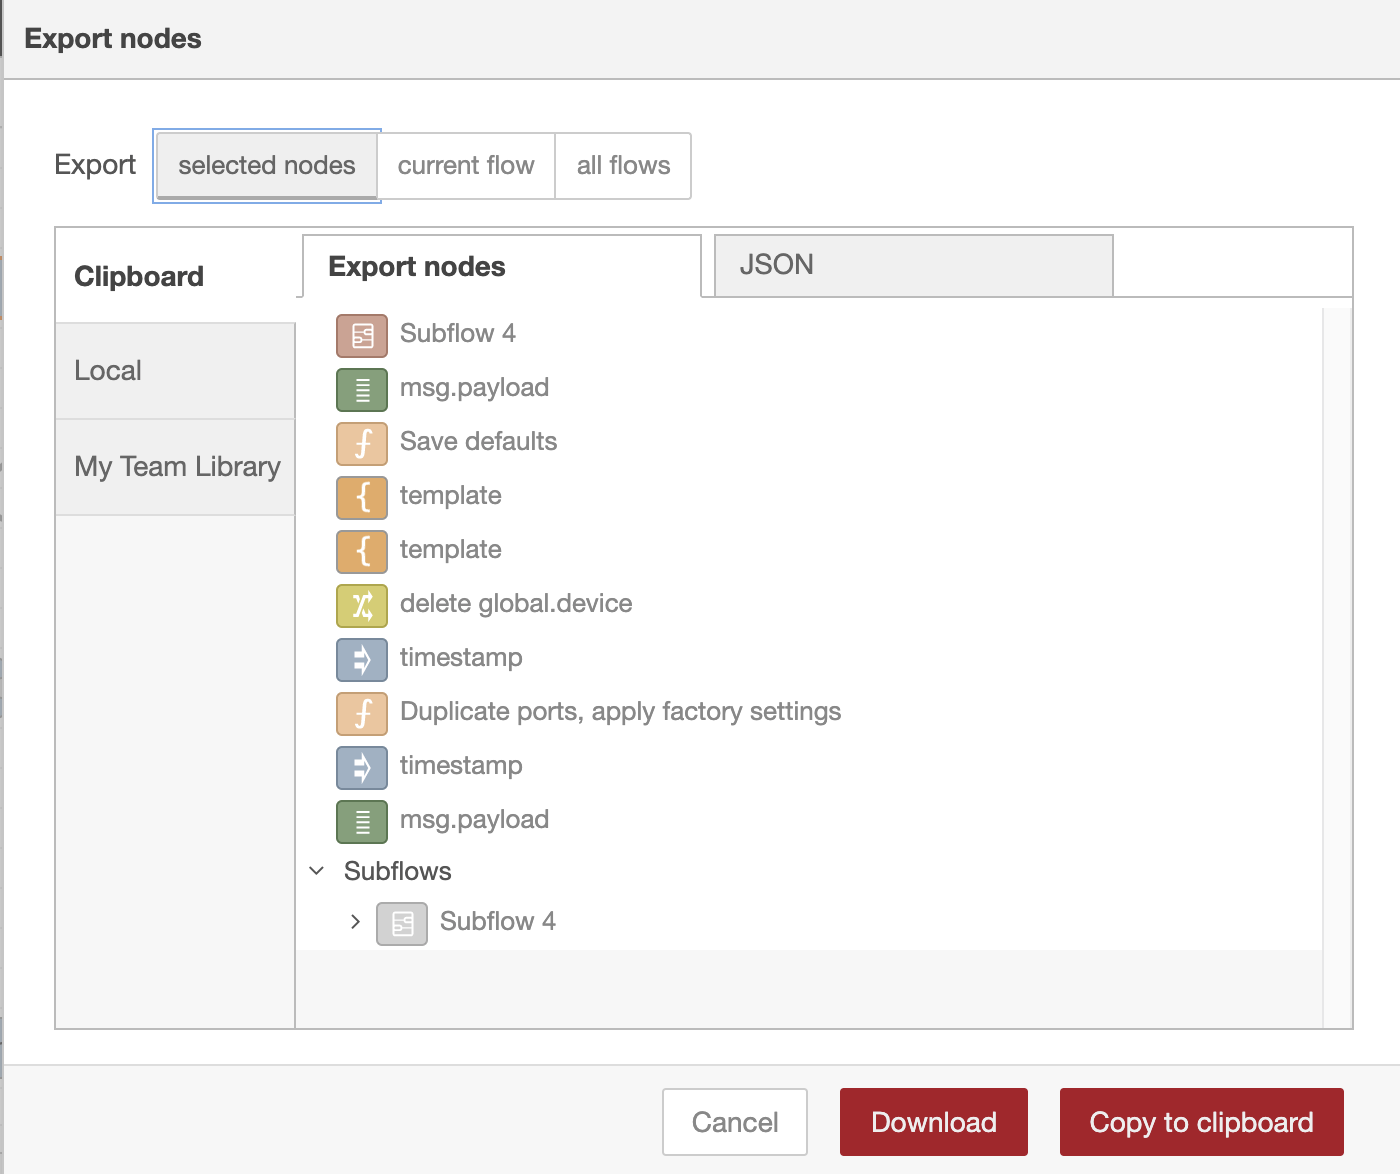
The Export dialog now shows a structured list of what you are exporting. The raw JSON can still be seen on a second tab in the dialog. This should help users understand what they are exporting.

Selecting nodes
If you shift-click on a node, we would already automatically select all of the nodes in its flow.
With this release, if you shift-click on the left-hand side of the node, we will select all of the up-stream nodes. If you shift-click on the right-hand side, we will select all of the down-stream nodes. Shift-clicking on the middle of the node will select the whole flow as before.
We’ve also added corresponding actions and default keyboard shortcuts for these:
core:select-connected-nodes-alt-s c- selects all nodes connected to the current selected node(s).core:select-upstream-nodes-alt-s u- selects all nodes reachable from the input of any currently selected nodecore:select-downstream-nodes-alt-s d- selects all nodes reachable from the outputs of any currently selected node
Opening a subflow
Previously, to open up a subflow you’d first have to double-click on an instance of it in your workspace, then click the ‘Edit subflow template’ button in the edit dialog that appears.
With this release, if you press Ctrl (or Cmd on Mac) when you double-click on the node, it will take you straight to the subflow template tab. Similarly, if the subflow instance is selected, holding Ctrl (or Cmd) when you press the Enter key will do the same thing.
Navigating around the workspace.
We’ve added some keyboard shortcuts to help navigating around the workspace.
- You can use the cursor keys to change what node is selected in the workspace.
- You can switch between tabs using
Ctrl/Cmd-[andCtrl/Cmd-] - When you jump between tabs, such as using
Ctrl-Enterto go to a subflow template tab, you can useCtrl/Cmd-Shift-ArrowLeftto go back to the last tab you were on. If you do use that to go back, you can then useCtrl/Cmd-Shift-ArrowRightto go forwards in the tab history.
Keyboard shortcuts
It is now possible to set custom keyboard shortcuts via the editorTheme option in the settings file. This means you can more easily copy your customisations between instances. More details
Other Editor updates
- If you reorder the sidebar tabs, we now ensure the first tab is always the one shown when you reload the editor.
- Add confirm dialog when deleting subflows with instances in use
- The Outline view in the info sidebar now shows how many instances of each subflow there are. Clicking on the number will open up the search dialog listing them all.
- You can toggle the enable/disabled state of a groups contents with a single click in the Outline view
Runtime Features
New externalModules setting
There is a new setting available that governs what can be installed into Node-RED - externalModules.
This covers two separate things - what new nodes can be installed via the palette manager, and what modules can be loaded by the Function node.
Under this setting, you can provide allow and deny lists that are used to determine what modules can be loaded by the runtime. These lists are also used by the editor to filter the list of nodes the palette manager shows.
This new setting replaces some existing settings which are now deprecated.
editorTheme.palette.editableforexternalModules.palette.allowInstallautoInstallModulesforexternalModules.palette.allowInstall = trueandexternalModules.autoInstall = trueautoInstallModulesRetryforexternalModules.autoInstallRetryeditorTheme.palette.uploadforexternalModules.palette.allowUpload
Other Runtime updates
- You can now explicitly set what language you want the runtime to use via the
langoption in the settings file. More details - When stopping flows, configuration nodes are now stopped last so that flow nodes can rely on them still existing whilst trying to stop themselves. More details
- You can now default to the simplified git workflow via your settings file with the
editorTheme.projects.workflowoption. More details httpAdminMiddlewareandhttpNodeMiddlewarecan now be an array of middleware to apply, rather than just a single function. More details
Node Features
- The MQTT nodes now support MQTTv5 and the vast majority of the new features v5 introduces.
- A number of the core nodes have been updated to support triggering the Complete node - Batch, Delay, Split, Join, Trigger
- The Exec node no longer appends
msg.payloadby default - this routinely caught users out. This only applies to newly added nodes - existing nodes won’t be affected. We’ve also updated the Exec node so you chose to append a message property other thanmsg.payload. - The Inject and Change nodes will now highlight any errors in their configuration when the edit dialog is closed.
- The Function node now exposes
node.outputCountso your code can know how many outputs the node has been configured with.
