Nodes
Nodes can be added to the workspace by either:
- dragging them from the palette,
- using the quick-add dialog,
- or importing from the library or clipboard.

Node port labels
Nodes are joined together by wires via their ports. A node can have at most one input port and many output ports. A port may have a label that is displayed when the mouse hovers over it. A node may specify labels, for example, the Switch node shows the rule that matches the port. The labels can also be customised in the node edit dialog.
Some nodes display a status message and icon below the node. This is used to indicate the runtime state of the node - for example, the MQTT nodes indicate if they are currently connected or not. The Status node can be used to trigger flows when a node’s status changes.

Node elements
If a node has any undeployed changes, it displays a blue circle above it. If there are errors with its configuration, it displays a red triangle. Hovering the mouse over the triangle will show a tooltip with details of the errors.
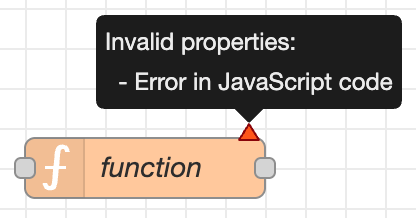
Node error tooltip
If a node has additional documentation, it will show a docs badge. Clicking on the badge will show a popup containing the documentation. This is also shown in the Information Sidebar when the node is selected. Clicking the pencil button in the popup will open the Description edit panel for the node.
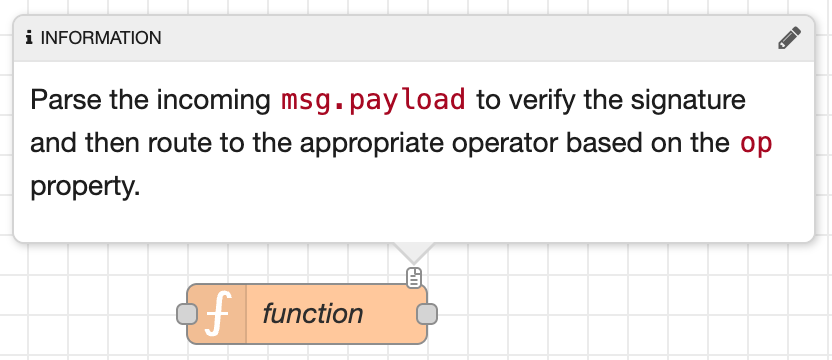
Node documentation
Some nodes include a button on either its left or right edge. These allow some interaction with the node from within the editor. The Inject and Debug nodes are the only core nodes that have buttons.
Quick-Add dialog
The Quick-Add dialog provides an easy way to add a node to the workspace wherever the mouse is, without having to drag it over from the palette.

Quick-Add dialog
The dialog is opened by holding the Ctrl or Command key when clicking on the
workspace.
The dialog contains a complete list of all nodes available to add. It shows the five main core nodes at the top of the list, followed by any recently added nodes and finally a complete, alphabetical, list of the remaining nodes.
As with the main palette, the dialog has an input at the top to filter the list and quickly find a node.
If Ctrl or Command is kept held down when clicking on a node in the list,
the node will be added and the Quick-Add dialog kept open to add the next node
in the flow.
If a wire is clicked on when triggering the dialog, the added node will be spliced into the wire.
Editing node properties
A node’s configuration can be edited by double clicking on the node, or pressing
Enter when the workspace has focus. If multiple nodes are selected, the first
node in the selection will be edited.
The edit dialog contains three tabs:
- : Properties - the edit form specific to the node type being edited.
- : Description - per-node documentation formatted using Markdown. This is displayed in the Information sidebar when the node is selected.
- : Appearance - options to customise the appearance of the node.


Node edit dialog - properties, description and appearance tabs
| Reference | |
|---|---|
| Action | core:show-selected-node-labels |
| Reference | |
|---|---|
| Action | core:hide-selected-node-labels |
The Appearance tab provides options to:
- select whether the node’s label is shown
- change the icon of the node
- provide custom port labels.
Enabling or disabling a node
| Reference | |
|---|---|
| Action | core:enable-selected-nodes |
| Reference | |
|---|---|
| Action | core:disable-selected-nodes |
An node can be enabled or disabled using the toggle button at the bottom of the dialog. If a node is disabled it will not be created when the flow is deployed. If a disabled node sits in the middle of a flow, no messages will pass through it.
Configuration nodes
A Configuration (config) Node is a special type of node that holds reusable configuration that can be shared by regular nodes in a flow.
For example, the MQTT In and Out nodes use an MQTT Broker config node to represent a shared connection to an MQTT broker.
Configuration nodes are added through the edit dialog of a node that requires the config node. It will have a field to select from the available config nodes of the required type or to add a new instance.

Adding a configuration node
Clicking the button next to the select box will open the edit dialog for the selected node, or add a new instance.

Configuration node edit dialog
The config node edit dialog only has the node properties and description tabs - as a config node has no icon or ports to set labels on.
In the footer of the dialog is an indication of how many nodes use this config node. It also provides a select box to set the scope of the config node. The scope determines which flows the config node is available on. By default it is available on all flows, but the select box can be used to make it local to just one flow.
As with normal nodes, it can also be enabled or disabled using the toggle button in the footer.
The Configuration Nodes Sidebar can be used to manage all config nodes.